DIY Violet Hairpin: Aesthetic Air Dry Clay Ideas for Beginners
Let's be honest: Do you also long for a little more color in your everyday life? While everything outside is still stuck in dull gray, I'm already dreaming of the first splashes of color in the garden. I'm particularly fond of the deep purple violets – for me, they are the ultimate symbol of awakening spring and natural elegance.
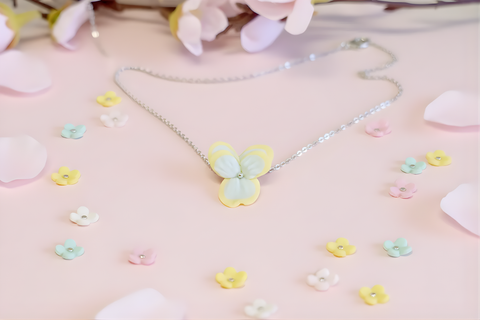
Since I didn't want to wait for nature to catch up, I simply brought spring into my studio. If you're looking for new Air Dry Clay Ideas that are not only decorative but also useful, then this project is perfect for you. Today, we're creating a delicate violet hairpin that will instantly elevate any outfit.
Ready for a dose of creativity? Check out the video for the tutorial:
🎥 Watch the Full Tutorial
This project is one of my favorite Air Dry Clay Ideas for Beginners because you can achieve a result that looks almost like real porcelain with very simple techniques. If you're searching for Air Dry Clay Ideas Aesthetic on Pinterest, you often end up with floral motifs – and for good reason! Shaping flowers from air dry clay is incredibly relaxing and the perfect Air Dry Clay Inspo project for a cozy afternoon.
From Clay to Kawaii — the complete beginner's guide

Most tutorials teach you one miniature. This 36-page guide teaches the six core techniques behind almost all of them — so you can build your own pieces instead of copying ours.
- Colouring, mixing and working with Japanese resin clay
- Decorating cream, realistic sauces and UV resin finishes
- Baked, grilled and toasted effects, texture and aging
- Varnishing, tool and material references, sourcing guidance
- Cheat sheets plus links to our YouTube demonstrations
Digital PDF — instant download, nothing shipped. Beginner level, no sculpting experience needed.
Get the eBook →Why is Air Dry Clay (air-drying clay) so trendy? Especially with Air Dry Clay Ideas for Adults, it's all about creating high-quality unique pieces without much effort (no kiln needed!). In this tutorial, I'll show you how to turn a simple Air Dry Clay Idea Easy into a real statement piece.
With air-drying modeling clay – more precisely, with our Resin Clay – you can create beautiful hair accessories that have a porcelain-like, hard, and smooth surface. The best part? You don't need an oven! The clay simply air-dries and becomes rock-hard. This easy Air Dry Clay idea is perfect for anyone who wants to get creative – whether you're a beginner or an experienced crafter.
Let's model these delicate blossoms together!
Step-by-Step: Violet Hairpin with Air Dry Clay
Create your own floral hair ornament! This step-by-step tutorial shows you how to make an aesthetic violet hairpin from air-drying Resin Clay. Perfect for beginners and DIY enthusiasts.

🎨 Materials Needed
- Resin Clay
- Acrylic paints (violet, purple or pink)
- Hairpin blank (hair clip/barrette)
- Superglue or jewelry cement
- Wood glue or craft glue
- Recommended: Sealer (matte or glossy)
- Small metal beads (approx. 3mm diameter)
⚒️ Tools
- Baking paper/parchment paper – smooth and waxed
- Dotting Tool
- Toothpick
- Small sharp scissors
- Craft knife
- Tweezers (optional)
- Flower-shaped cutter (violet/flower, approx. 1–2 cm diameter)
📝 Step-by-Step Instructions
Coloring Resin Clay
Knead a tiny dab of acrylic paint into a little Resin Clay. Knead well to achieve an even color.

Roll out & cut out blossom
Roll out the Resin Clay thinly (approx. 1mm) between two sheets of baking paper. Use the flower cutter to cut out the violet shapes. Immediately re-pack any leftover clay airtight.

Forming petals
Cut the punched-out flower towards the center with scissors to separate the petals individually. You will get five petals. However, for this design, you only need three. Still, form all the petals and then choose the three most beautiful ones for your hairpin.

Texturing the petals
Place the toothpick on the petal, press the tip lightly and roll it back and forth to thin and stretch the leaf. With a craft knife, you can also create additional leaf veins/lines by lightly scoring the Resin Clay.
Finally, you should gently curve each petal by pressing it softly against a pencil or the handle of a dotting tool.
Now let your petals dry.

Arranging the violet
Cut a little off the pointed end of each petal orthogonally, so it becomes blunt. This makes it easier to arrange the three petals with each other.
Create a base from the same kneading clay, approximately 8 mm in diameter and 1 mm thick.
Apply craft glue/wood glue to the tip of the petal and attach it firmly to the base with tweezers.Glue a total of 3 petals as shown in the picture.

Decorating the violet
Apply some superglue/jewelry cement to the center of the flower and place the metal bead on it with tweezers.

Attaching to the hairpin
Now apply some jewelry cement or superglue to the bezel of your hairpin and place your violet on it. Let it dry well!

Sealing the violet (recommended!)
To protect your creation from moisture and dirt, you should apply 1-2 thin layers of sealer.

Finished! You did it :)

💡 Pro Tip: Work quickly, as Resin Clay dries faster than other air-drying modeling clays. If it dries too quickly while you're working, you can simply moisten it with a few drops of water to make it pliable again.
For the ultimate aesthetic look, use a matte or glossy sealer – this also protects your Air Dry Clay creation from moisture!
A quick word on material selection for Air-Dry Clay accessories:
Always use Resin Clay for delicate blossoms and fine details. It dries with a porcelain-like, hard, and smooth surface – rock-hard and perfect for jewelry and hair accessories. Foam Clay is excellent for voluminous, soft shapes, but not for delicate petals. And: always seal your accessories! Body heat and moisture can negatively affect the long-term durability of unsealed Air Dry Clay creations.
Have fun creating your own Violet Hairpin from Resin Clay! 🌸
New to air dry clay? Our ultimate beginner's guide covers everything you need to know about clay types, coloring, and drying — all in one place. New to air dry clay? Our ultimate beginner's guide covers everything you need to know about clay types, coloring, and drying — all in one place.
🎨 You might also like


📖 Read the first chapter free
Don't take our word for it — see it for yourself. We'll email you the opening pages and the complete first chapter of From Clay to Kawaii, free. Like it? Come back and grab the rest.